Sizing
Sizing FAQ
Collapsible content
How to measure my nails for press-on nails?
1. Gather the Necessary Tools
- A ruler or measuring tape (preferably in millimeters for precision)
- A pen or marker
- A nail file (optional, for adjustments)
2. Measure Your Nails
Follow these steps to measure your nails accurately:
- Measure Nail Width:
Measure the widest part of each nail (usually across the nail bed) from one side to the other. This is important because press-on nails need to fit the width of your nail. Measure the nail at the base (near the cuticle) where the press-on will sit, rather than at the tip of your finger.
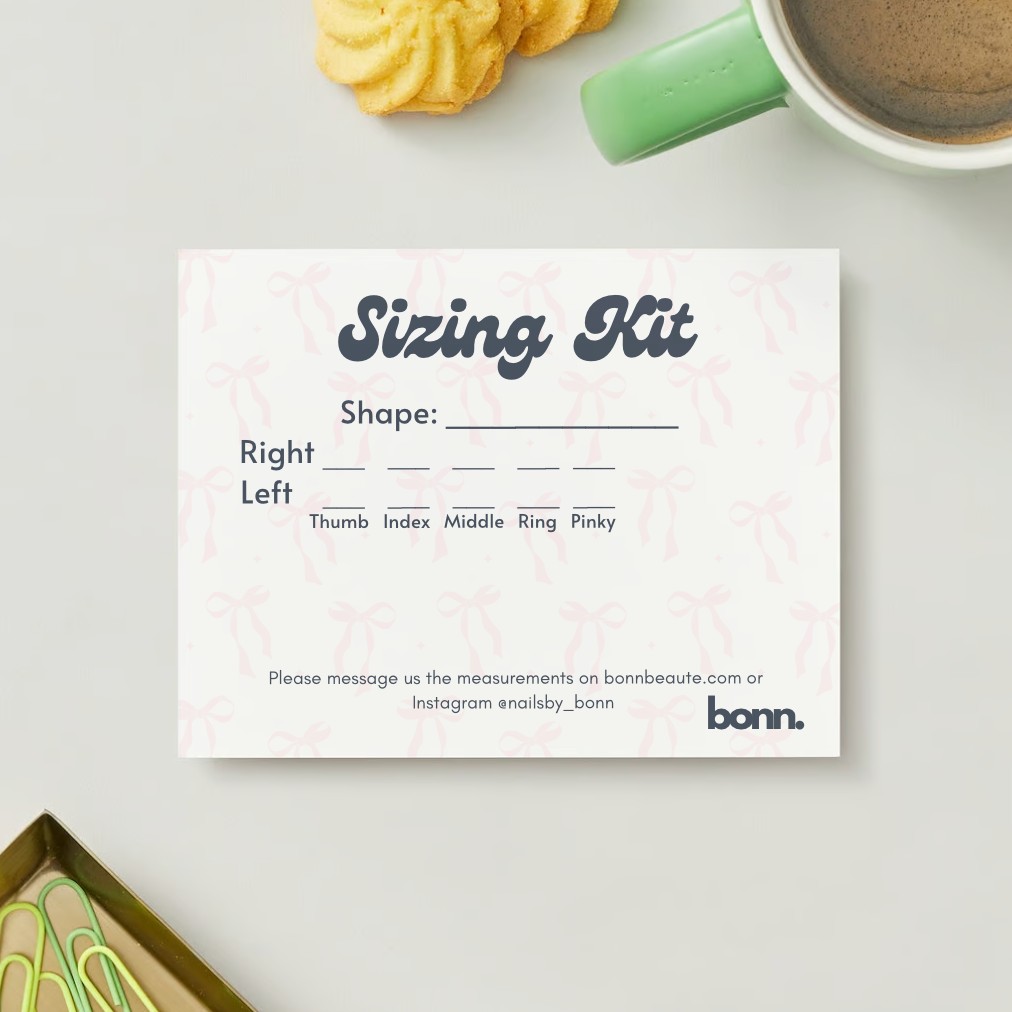
- Use Sizing Kit
To ensure a perfect fit, order a Sizing Kit with full sizes tips to measure your nails from left hand to right hand, thumb to pinky. Share your measurements with us, and we'll take it from here.
3. Choose Press-On Nails Based on Size
- Match Sizes:
Order a Sizing Kit that comes with full sizes. Look at the measurements to match your nail width with the press-on size. You can also compare the width and length measurements of your nails with the press-on nails to determine which size is most suitable for each finger.
- If Your Nails Are Between Two Sizes:
If your nails are between two sizes, it’s generally better to go for the larger size for a more comfortable fit. You can file the press-on nails to fit your natural nails better if necessary.
4. Try the Press-On Nails Before Application
- Once you've selected the appropriate sizes, try the press-ons on your nails to see how they fit. They should cover your nail comfortably without spilling over the sides, but they should not be so tight that they feel uncomfortable.
- If needed, file the sides of the press-ons slightly to make them fit better, especially if they are too wide.
5. Optional: Adjusting for Perfect Fit
- If you find that the press-on nails don’t fit perfectly, use a nail file to gently shape the press-ons to your natural nail’s width or length.
- You can also buff the underside of the press-on nail if you want to improve adhesion or make them sit better on your nail.
6. Apply the Press-On Nails
- Once the sizing is accurate, follow the instructions on the press-on nail kit to properly clean your natural nails and apply the press-ons using adhesive tabs or glue.
By carefully measuring and selecting the right size, your press-on nails will look more natural and stay in place longer!
The press-on nails don't fit my nails, what should i do?
It's essential to get the sizing right the first time to avoid any issues. Here’s what you can do to ensure a better fit before placing an order:
1. Order a Sizing Kit First
We offer sizing kits that let you try different sizes before committing to the final order. Here's how to make the most of a sizing kit:
- Try the Sizes: Use the sizing kit to find the best fit for each of your nails.
- Match the Sizes: Note the size that fits each of your nails best. Once you know the correct sizes, you can confidently place your order for custom press-ons.
2. Trim or File the Press-Ons
- File the Sides: If the press-on nails are too wide, you can gently file the sides to make them narrower. Use a fine-grit nail file to avoid damaging the press-on nails.
- File the Length: If the press-on nails are too long, trim them to the desired length using a nail clipper. After trimming, file the edges to smooth them out and create a more natural appearance.
3. Use a Different Adhesive
- If the press-on nails are slightly loose but still the right size, you may need to use a stronger adhesive or nail glue to improve the fit. Some press-on nail kits come with adhesive tabs that may not be as strong as glue.
- Applying nail glue can provide a stronger bond, but be sure to use a thin layer to avoid excess glue spilling out.
4. Check Your Natural Nail Condition
- If the press-ons are not sitting properly due to uneven nail beds, make sure to buff the surface of your natural nails lightly to create a smoother, more even texture. This will help the press-ons adhere better.
5. Use a Different Size or Kit
- If none of the press-on nails in the kit fit your nails properly, consider buying individual press-on nails, or replacement that offer customizable sizes.
6. Try the "Free Edge" Method
- If you have press-ons that are too large, you can try using them on different nails. The free edge method involves finding the press-on nail size that fits your largest nails (such as your thumbs) and trimming it down for your smaller nails.
By making these adjustments, you should be able to get a much better fit for your press-on nails, and they should feel comfortable and look natural. If you're still having difficulty finding a perfect fit, experimenting with different brands or even looking into custom options could be a good solution!
Can I get a refund if my nails don't fit?
Unfortunately, all press-on nails are made to order, specially for you. We're unable to accept returns & exchanges for press-on orders. Please ensure your nails would fit by ordering a sizing kit beforehand.

Bonn Beauté
Press-on Sizing Kit
Share